![]()
Because there are variables beyond my control (clays, papers, water, mixing errors and etc) always pre test fire what you have before a big project. No guarantee can be offered that 'alternative" commercial paperclays now on the market will meet the all the performance advantages of my high performance trademark P'Clay® brand only available from licensed manufacturers/distributors.
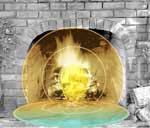
In the "fire" picture above notice the circled "regions or zones" of heat radiating out from the center. The closer in to the coals, the hotter the fire is.
In Brief:
To fire a freshly made, small (fit in the palm of a hand) sized pot you have go in stages slowly. First, dry and warm it near the edges of the fire zone. After clay pot is dry you can gradually nudge it closer to the hotter center of the heat zones.
camp open flame experimental firing with paperclay:
If a campfire, open pit, barbecue, or on a beach, all sides of the fire can be used for controlling the gradual drying and heating of the pot. It takes at least and hour or more depending on size and wall thickness of your pots. Try some test paperclay pots with thin walls first until you get the sense of the process, and at your own risk.
Tools and Safety: Have some leather gloves, eye protection, skin and feet protection and observe common sense safety, no unsupervised children, etc. Have tongs or a "poke in the fire" tool. Wear cotton, leather, or wool clothing, and/or gloves. Avoid synthetic fabric, nylon shells, rubber that if they touch a hot pot by accident can ruin them beyuond repair.
Modeling consistency soft paperclay. Be sure you have enough pulp in your studio batch of p'clay® recipe. Pots will blow apart if not. The commercial blend of P'Clay I used should work, but test fire in case of bad batch.
Build fire: Build a small fire with wood or charcoal and wait at least until the first hot coals start to form and radiate heat under the wood.
Step 1: Place fresh soft wet pinch or coil p'clay® pots in the "green region" (outer circle in picture ) to warm and dry out. Turn p'clay pot/figureso all sides to get hot and dry it out, about 10 minutes each side or so. Toast fully dry before moving them closer in. For gloss sufaces on p'clay, burnish (rub or polish down surface) with back of spoon or smooth stone as form is drying out. This takes as long as you like, half hour to hour. Simmer do not rush at this stage. Easy. Gentle. "Toast."
Step 2: Move pots in closer to the heat: edge of green and yellow circle above. Let them get hotter on all sides as before, still another 15 minutes or so. Use the tongs or gloves as needed. Pots will soon will be too hot for bare hands.
Step 3: Next, move pots even closer to the coals now well into the orange region... for still more heating. Turn every once in while again about 15 minutes or so if walls are thinnner than1-2cm (1/4-3/8 inch). Use the tongs or gloves as needed.
Step 4: Ultimately, nudge hot pots right into the coals and and bury them under the hot coals, so they heat evenly. Pots should be getting red hot by contact with the coals before long. Use the or gloves with tongs or poker to adjust them.
Finish: Options: A. either just leave the pots in the coals until the fire burns out next day, and dig them out of the ash; Or B. after 15-30 min drag them out of the fire, like in "raku" and then smoke them in a reduction pit in the sand, dirt, or large metal non plastic bucket. Introduce sawdust, paper, dried leaves, on top the glowing forms (as you might or a raku fire) then quick cover them with garbage can lid or smother earth over red hot pot to produce dark smoke. And/Or after 3-5 minute smoking time, uncover them and then quickly douse/immerse the smoked pots in a bucket water to quick cool them. Remove from water 2-5 mins later and have a take home fired piece.